DIY Decor Projects

Cheap living room wall decor ideas – Creating stylish and affordable living room decor is achievable through DIY projects. Repurposing materials and employing simple crafting techniques can dramatically enhance your space without breaking the bank. This section details several projects using reclaimed wood, repurposed materials, and readily available supplies.
Reclaimed Wood Wall Shelves
Several types of wall shelves can be constructed using reclaimed wood, offering a rustic charm and unique character. The choice of wood and finish will greatly influence the final aesthetic.
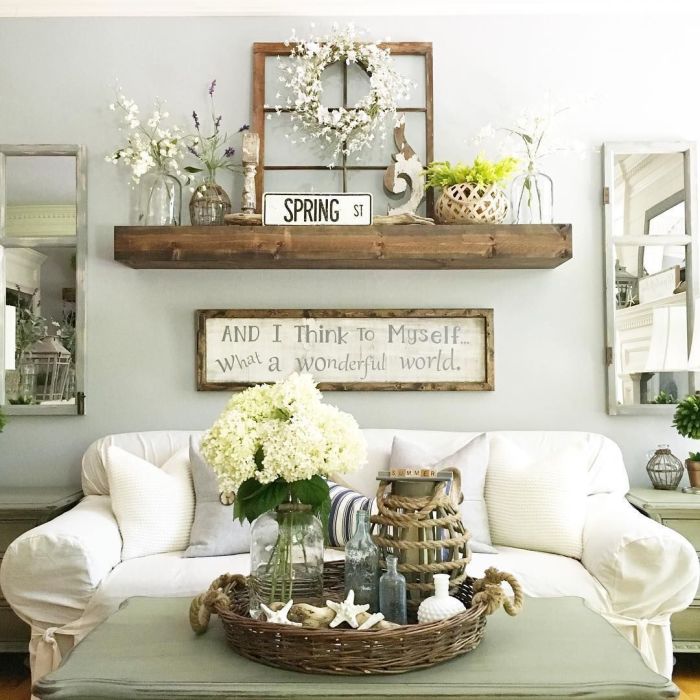
- Floating Shelf: This requires a single piece of reclaimed wood, cut to your desired length. Sand the wood smooth, apply a stain or paint (optional), and attach hidden L-brackets to the back. Secure the brackets to the wall studs for stability, ensuring the shelf is level. This creates a minimalist, clean look.
- Rustic Ladder Shelf: An old wooden ladder, found at a flea market or salvaged from a renovation, can be repurposed into a charming shelf. Clean and sand the ladder, then secure it to the wall using sturdy brackets. You can leave it as is for a more rustic look, or paint it a fresh color. This shelf offers vertical storage space.
- Industrial Pipe Shelf: This requires galvanized pipe fittings (elbows, flanges, and pipes) and a reclaimed wood plank. Cut the wood to the desired length and sand it. Assemble the pipe fittings according to your design, attaching the wood plank to the finished pipe structure. This style creates a modern industrial look.
Macrame Wall Hanging
Macrame wall hangings add a touch of bohemian elegance to any room. The process involves various knotting techniques, creating a textured and visually appealing piece.
Materials: You will need 3-4mm cotton cord (various colors), a wooden dowel or driftwood, scissors, and a measuring tape.
Process: Begin by cutting lengths of cord, approximately 4 times the desired length of the finished hanging. Secure the cords to the dowel using a lark’s head knot. Then, create a series of square knots, alternating the working cords to form a textured pattern. You can incorporate other knots like the half hitch or spiral knot for added complexity.
Once the desired length is reached, carefully trim the ends and fringe them for a bohemian look. The finished product will be a decorative hanging featuring a variety of textured knots and cord colors, creating a visually interesting piece.
Repurposed Picture Frame Decor
Old picture frames, often discarded, can be transformed into unique wall accents with minimal effort and cost.
Budget-conscious living room design often prioritizes resourceful solutions. For instance, repurposing existing items or employing DIY techniques can significantly reduce costs. This principle extends to other rooms; the aesthetic appeal of gold wall decor for bathroom demonstrates how inexpensive materials, such as gilded frames or metallic paint, can create a luxurious feel. Applying this same principle of creative repurposing and cost-effective materials to the living room ensures stylish decor without exceeding budgetary constraints.
- Mirror Frame: Remove the glass and backing from an ornate frame. Attach a mirror cut to fit the frame’s opening using mirror adhesive. This creates an elegant and inexpensive mirror.
- Chalkboard Frame: Paint the inside of the frame with chalkboard paint. This allows for writing messages or drawings directly onto the frame. You can add a decorative border around the frame to complement the chalkboard surface.
- Fabric-Covered Frame: Cut a piece of fabric slightly larger than the frame’s opening. Stretch the fabric taut over the opening and secure it to the back using staples or glue. This creates a textured and colorful accent piece.
- Miniature Gallery Wall: Use several small frames to create a gallery wall featuring small prints, pressed flowers, or even miniature photographs. Arrange the frames in a pleasing pattern to enhance the overall aesthetic.
- Shelving Unit: Attach several frames of similar size and depth together using wood glue and small brackets to create a small, decorative shelf. This can be used to display small plants or decorative objects.
Utilizing Existing Items: Cheap Living Room Wall Decor Ideas

Repurposing what you already own is a fantastic way to refresh your living room without breaking the bank. A little creativity can transform familiar pieces into a completely new look, adding personality and style to your space. This section will explore several effective techniques for maximizing the potential of your existing furniture and décor.
Rearranging Furniture and Décor for a New Living Room Layout
Sometimes, all it takes to revitalize a living room is a simple rearrangement. Consider the flow of traffic, the focal point of the room (often the fireplace or a large window), and the size and shape of your furniture. Experiment with different arrangements to find one that maximizes space and creates a more balanced and inviting atmosphere. Below is a comparison of a before and after scenario illustrating the impact of furniture rearrangement.
| Before | After |
|---|---|
| Imagine a living room with a sofa pushed against one wall, a coffee table directly in front, and an armchair tucked awkwardly in a corner. The TV is on a stand opposite the sofa, leaving a large, empty space in the center of the room. The overall feeling is cramped and somewhat disjointed. | Now picture the same room, but with the sofa angled slightly, creating a more open and inviting space. The armchair is now placed near the window, creating a cozy reading nook. The coffee table is positioned to allow for easy movement around the seating area. The TV stand is repositioned to better complement the new layout. The result is a room that feels larger, more balanced, and significantly more welcoming. |
Strategic Mirror Placement to Enhance Space and Light
Mirrors are powerful tools for creating the illusion of more space and brightening a small living room. Their reflective surfaces bounce light around the room, making it feel more open and airy.
- Large Mirror as a Focal Point: A large mirror positioned above a mantelpiece or on a larger wall can significantly enhance the feeling of spaciousness. The reflection doubles the visual depth of the room, creating a sense of expansiveness. Consider a mirror that is at least half the width of the wall it’s placed on for maximum impact.
- Smaller Mirrors in Clusters: Several smaller mirrors arranged together can create a similar effect to a large mirror, but with a more eclectic and artistic feel. Consider grouping mirrors of varying shapes and sizes for a visually interesting display. Experiment with different arrangements until you achieve the desired look.
- Mirror Placement Opposite a Window: Placing a mirror opposite a window will maximize natural light. The mirror will reflect the light, effectively doubling the amount of natural light in the room, making it feel brighter and more welcoming. The size of the mirror should be proportionate to the size of the window; a small mirror opposite a large window will have less impact than a larger mirror.
Using Throw Blankets and Pillows to Add Color and Texture
Throw blankets and pillows are inexpensive and versatile ways to add visual interest to a living room without cluttering the walls with additional décor. They can easily be rearranged to change the overall look and feel of the room.Drape a textured throw blanket over the back of a sofa or armchair, or use several blankets in varying textures and colors to create a layered look.
Similarly, arrange pillows of different sizes, colors, and patterns on the sofa or chairs to add depth and visual interest. This technique is especially effective in a room with neutral-colored walls, where the textured blankets and pillows can become the main focal point.
Creative Textural Elements
Adding texture to your living room walls is a fantastic way to inject personality and visual interest without a hefty price tag. Natural materials offer a rustic charm, while textured wall coverings and stenciled designs provide a broader range of stylistic options. This section explores various approaches to creating textured wall art using readily available and affordable materials.
Natural Material Wall Art Designs
Three distinct living room wall designs using branches, twigs, and dried flowers are presented below. These designs offer varying levels of complexity and visual impact, demonstrating the versatility of natural materials.
| Design 1: Rustic Branch Garland | Design 2: Dried Flower Mandala | Design 3: Twig and Flower Mobile |
|---|---|---|
| This design features a long garland created from varying lengths of collected branches, arranged horizontally across the wall. Thicker branches form the base, with thinner twigs woven in between for visual interest. Small bundles of dried flowers can be strategically placed along the garland to add pops of color. The branches should be cleaned and lightly sanded for a smoother finish. Secure the garland to the wall using small, discreet nails or strong adhesive. | A mandala is a circular design symbolizing wholeness and balance. This design involves arranging dried flowers and small twigs in a circular pattern on the wall. Start with a larger, central flower or twig arrangement and work outwards, layering smaller elements to create depth and texture. Use strong adhesive to secure the elements to the wall. The color palette should be carefully considered for a cohesive look. For example, warm tones like oranges and yellows create a cozy atmosphere. | This design is a three-dimensional mobile created from twigs and dried flowers. A variety of twig lengths are used to create a frame, and the dried flowers are hung from the frame using thin thread or fishing line. The mobile is then suspended from the ceiling using a long piece of string or fishing line. The design can be customized with different colors and flower types to match existing room decor. For instance, pastel-colored flowers in a delicate mobile could complement a light and airy living room. |
Textured Wall Covering Ideas, Cheap living room wall decor ideas
Incorporating textured wall coverings adds depth and visual interest to a room without significant expense. The following five ideas illustrate different application processes and aesthetic outcomes.Adding texture through wall coverings offers a simple yet impactful way to transform your living room. The application process varies slightly depending on the chosen material.
- Burlap Drape: A large piece of burlap can be draped and pinned to the wall, creating a rustic and textured focal point. The drape can be left loose or carefully arranged for a more structured look. This requires minimal tools, simply pins or tacks to secure the burlap to the wall.
- Fabric Panels: Cut patterned fabric into panels and attach them to the wall using fabric glue or double-sided tape. This is a great way to showcase unique prints or patterns. The panels can be arranged in a grid or a more organic pattern.
- Patchwork Wall Covering: Create a unique patchwork effect by using scraps of different textured fabrics – think velvet, linen, and cotton. Apply these pieces to the wall, overlapping them slightly, to create a dynamic and visually interesting surface. This method requires patience and attention to detail for a cohesive look.
- Stenciled Fabric Application: Stencil a design onto fabric using fabric paint, then apply the fabric to the wall using the same method as fabric panels. This allows for more control over the pattern and color scheme. For instance, a floral stencil on a light-colored fabric could create a fresh, spring-like feel.
- Layered Paper: Layer different types of textured paper, such as scrapbooking paper, onto a section of the wall. This can create a collage-like effect. Secure the layers using a strong adhesive suitable for paper and walls. This technique allows for creativity and flexibility in design.
Stenciled Wall Designs
Utilizing patterned stencils and inexpensive paint offers a versatile and affordable method for creating unique wall designs. The key lies in selecting appropriate stencils and paint, and employing the correct application techniques.Stencils provide a simple and effective way to add pattern and visual interest to your living room walls. The choice of stencil and paint will significantly impact the overall aesthetic.
- Geometric Patterns: Simple geometric stencils, such as stripes, chevrons, or polka dots, can be used to create a modern and clean look. Use painter’s tape to mask off sections for clean lines.
- Floral Motifs: Delicate floral stencils add a touch of elegance and romance. Choose a color palette that complements the existing décor. Layer different stencils for added complexity.
- Damask Designs: Damask patterns offer a more traditional and ornate look. Use a metallic paint for a luxurious touch. Ensure the stencil is firmly secured to prevent smudging.
- Layered Stenciling: Apply multiple stencils in layers to create more intricate designs. This technique requires patience and precision, but the results can be stunning. Consider using different colors to highlight various elements of the design.
- Sponge Stenciling: Use a sponge instead of a brush to apply the paint for a more textured effect. This is particularly effective with bolder patterns and colors. Dab the sponge gently to avoid smudging.
Popular Questions
Can I use wallpaper as a cheap wall decor option?
Yes, wallpaper is a cost-effective way to add texture and pattern to your walls. Look for affordable options at discount stores or online retailers.
How can I make my living room feel bigger with cheap decor?
Use light colors, mirrors to reflect light, and strategically placed lighting to create an illusion of more space.
Where can I find cheap frames for artwork?
Thrift stores, flea markets, and online marketplaces like eBay or Craigslist often offer affordable frames.
What are some low-cost ways to add texture to my living room walls?
Use textured fabrics like burlap or tapestry, or create a textured effect with paint using stencils or sponges.


